The Best Time of Year to Start the Deck Building Process
January 8, 2026When Pennsylvania homeowners are looking to build a new deck for their home, one of the questions they’ll have is when the best time of
When speaking with a deck contractor about building your dream deck, it’s important to understand the parts of a deck and how they are constructed. Once you do, you can communicate clearly with your contractor and know what he’s referring to during your discussions.
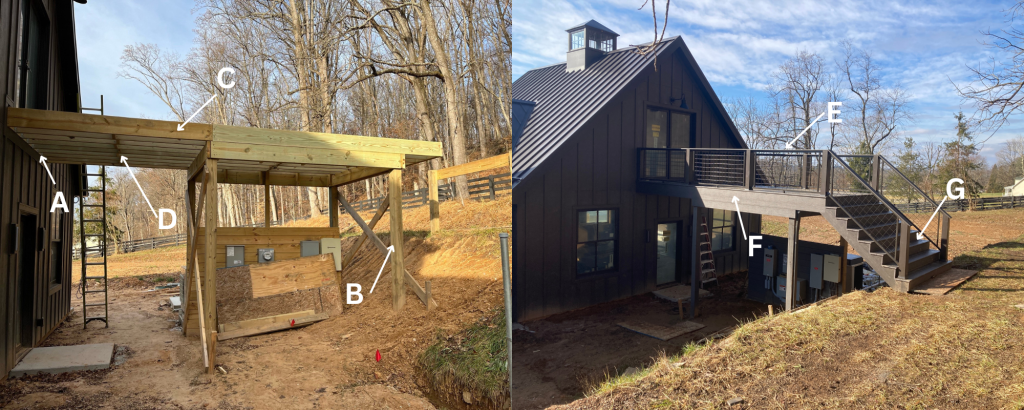
A. Ledger: The ledger board is attached to the house and acts as the main support beam for the deck.
B. Posts: Deck posts provide vertical support and are set in concrete footings to ensure stability.
C. Beams: Beams run perpendicular to the ledger to support the joists and decking, ensuring the deck can handle the load.
D. Joists: Joists are the parallel supports that run between the beams, holding up the decking boards.
E. Railing: Deck railings provide safety and can enhance the aesthetic appeal, installed around the perimeter.
F. Trim: Trim pieces add a finished look by covering exposed edges and protecting the structure from weather damage.
G. Decking: Decking boards form the surface of the deck and can be made from wood, composite, or PVC materials.
Before you begin building a deck, thorough planning and design are essential. Consider the deck’s purpose, size, and location to help with design. Check local building codes and obtain necessary permits to avoid fines. Lastly, choose materials that fit your budget and aesthetic preferences. When working with an experienced contractor, he’ll guide you through the planning process.
Every deck starts by attaching the ledger board to the house. This step involves securing the ledger with lag bolts or through bolts, ensuring it is level and properly flashed to prevent water intrusion. A strong, well-installed ledger board is critical for the stability of the entire deck.
Next, the deck posts are set in concrete. Post holes are dug to a depth below the frost line, and filled with concrete. Posts are placed in the wet concrete, aligned, and made plumb. Then, the concrete must fully cure before proceeding.
Once the posts are set, the outer joists are installed. These are the frame’s perimeter joists, connecting to the ledger board. The outer joists are leveled, made square, and securely fastened to the ledger and posts.
With the outer joists in place, the beams are installed perpendicular to the ledger. Beams should be securely attached using brackets on the ledger and front outer joist. It’s important that the beams are level and stable, as they will support the inner joists and decking.
Next, the inner joists are installed. These run perpendicular to the beams and side outer joists, spaced according to the decking material specifications (typically 16 inches on center). The joists are secured with joist hangers and must also be level and evenly spaced.
If your deck design includes railings, they are installed after the joists are in place but before the decking, so that the decking can be cut around the railing posts. Following local building codes, you might be required to include railings at a certain height with regulations on how far apart to space the posts and balusters.
Finally, the trim and decking boards are attached. The decking boards are installed perpendicular to the inner joists, leaving appropriate gaps for drainage. Each board is secured with screws or hidden fasteners, which leave a smooth and even surface. Then, the trim pieces are attached to the perimeter to cover the exposed edges and provide a more finished look.
While building a deck can be a rewarding DIY project, a lot can go wrong when you try to do it yourself. Hiring a professional will ensure your deck is safe, up to code, and built to last. They will also help with the design, material selection, and obtaining necessary permits. Additionally, professionals often have access to better tools and can complete the project more quickly and efficiently. If you’re looking to save time, reduce stress, and ensure a high-quality finished product, contact Decks R Us today.
When Pennsylvania homeowners are looking to build a new deck for their home, one of the questions they’ll have is when the best time of
Raised and second-story decks are becoming more and more popular in Pennsylvania. When you have a raised deck, there will be space underneath it that
A deck is a great way to enhance your outdoor living space, but they do not have to be simple. During the design process, you